A microwave is an indispensable kitchen appliance we use every day, often several times, to heat food and liquids, or even cook, bake, and grill. They come in various sizes and models, but all share some basic parts and features, including the light bulb that lights up when you open the door. Encountering a problem with a microwave light not working can be frustrating, but understanding the possible causes and solutions can simplify the situation. This guide will delve into those aspects, offering practical advice to restore your microwave’s functionality efficiently.
The Replacement Light
Embarking on the first step to illuminate your microwave, the journey begins with a quest to find the right replacement light. Drawing from my own escapades in kitchen repairs, I recall the criticality of this phase. You must look up the make and model of your microwave. This knowledge is not just trivial; it’s the cornerstone in ensuring you confirm the correct size and wattage of the light bulb needed. Once armed with this information, the adventure continues as you decide whether to order the lightbulb online or to pick up one from a local hardware store. In my experience, both avenues have their charm – the former offers convenience, while the latter provides the satisfaction of immediate gratification. Either way, the glow of success is just a bulb away.
-
Find the Right Bulb
Before you get involved in taking your microwave apart, it’s essential to make sure you have the right type of bulb. My approach always begins with looking up the microwave’s model to determine the correct wattage and size you’ll need. This information is crucial as it guides you whether to head to your local hardware store that might have it in stock, or to order it online. Once you have the right bulb, the real work can start. With the new bulb actually in hand and ready to go, you can confidently proceed with the replacement, knowing you’ve got the perfect fit for your microwave.
-
The Tools You’ll Need
In tackling the task of fixing a microwave light, the right tools play a pivotal role. From my personal experience in appliance repairs, you’ll need a few key items: a screwdriver, ideally a Phillips (cross) head screwdriver, which is used in most microwaves. Sometimes, a slot screwdriver or a nut driver might be necessary, depending on the model. Essential to the repair is the correct type of replacement light bulb. It’s vital to match it precisely with your microwave’s specifications. And don’t forget work gloves for safety and ease. With these two tools and a bit of caution, swapping out a microwave light bulb is a straightforward task, merging safety with efficiency.

-
Unplug the Appliance
When it comes to fixing a microwave light, one fundamental rule is to never work on an electrical appliance while it’s plugged in. Whether it’s simply changing the bulb or more in-depth repairs, always play it safe and unplug the appliance completely before beginning any work. This precautionary step is crucial for your safety and should be the first action taken in any repair process. It’s a small but vital practice I’ve always followed in my experiences with appliance repairs.
-
Test It Out
Once everything is screwed back in, it’s time to plug your microwave back in and see if the new bulb is working. If it isn’t, don’t fret. Sometimes, the issue may lie beyond a simple bulb replacement. In such cases, it’s wise to contact a reliable appliance repair shop for assistance. They can offer expert advice or services to ensure your microwave is fully functional again. Remember, successfully fixing a microwave light often involves a bit of trial and error, but with the right approach, you’ll get it shining bright again.
-
Safety First
When opening your microwave for any repair, the safety of consumers like us is paramount. One must wear work gloves, a simple yet effective way to protect against cuts from sharp components. These components are not meant to be touched without proper protection. The gloves provide a safeguard while handling the sides and appliance panels which are often sharp and not designed for frequent consumer interaction. This precautionary step is essential, as I’ve learned from personal experience, to ensure a safe and successful repair process.
Inside the Microwave Compartment
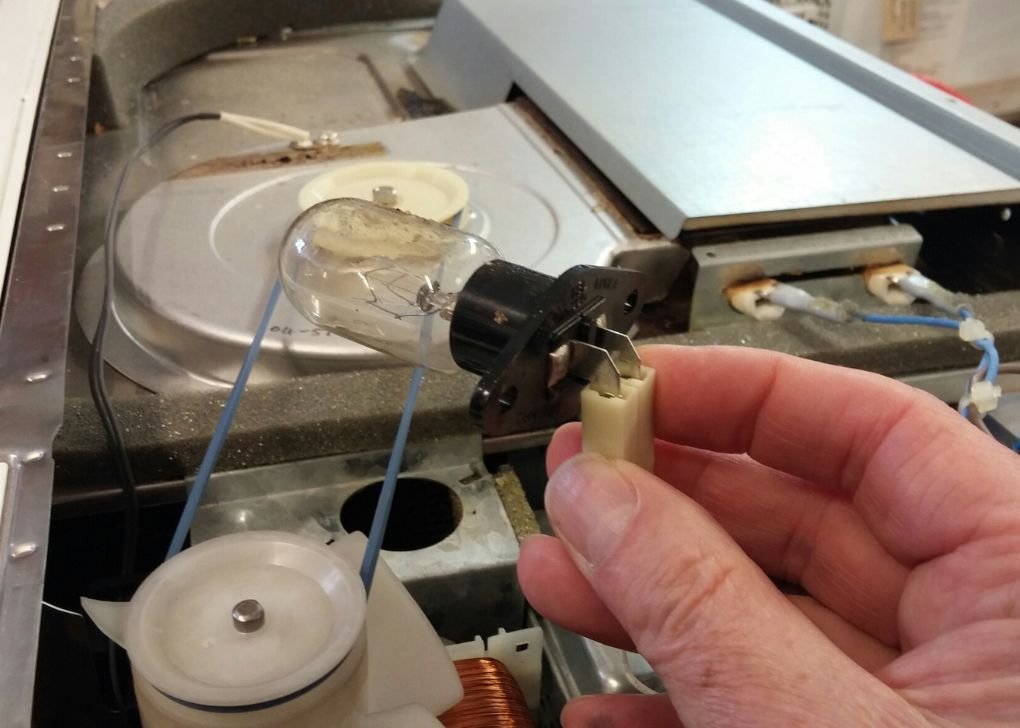
Venturing into the microwave compartment, the first step is to grab your screwdriver and remove the mounting screws that secure the light cover. This cover might be held in place by a clip or clamp, which you’ll need to release by gently pulling it down. Once open, you’ll see the old light bulb. Carefully replace it with a new light bulb, making sure to twist it securely in place. Remember, not too tight, as over-tightening can damage the bulb.
Now, put everything back in place, aligning the tabs with the slots and reapply the light cover. Fasten it with the mounting screws, ensuring it’s snug and secure. Finally, plug your microwave back in, and it should be good to go. The satisfaction of seeing that light come back on with a simple bulb change is quite rewarding, reminding you that some fixes are simpler than they seem.
Behind the Microwave
In my journey of appliance repairs, I’ve found the light cover often not accessible from the front; instead, open the back compartment. To change it, you might need to move the microwave from its cabinet.
When addressing a microwave light issue, the process begins with a simple turn of the appliance. Around to its back, I always start by grabbing my trusty screwdriver. The first step is to remove the mounting screws located along the edge of the back panel. Gently pull the cabinet cover away from the top and sides, and set it aside. Now, inside, you’ll find the light bulb cover. Carefully remove the old bulb and replace it with the new light bulb. Make sure to twist it securely into place. Then, it’s time to return the cabinet cover, ensuring it fits into the edges and slots correctly. Once everything is secure, plug in your microwave and check if the light is working.
If your microwave light isn’t working correctly, don’t worry. It’s a common problem often linked to electrical issues. From my hands-on experience, first contact the manufacturer’s support if your appliance is still under warranty. If not, today is a good day to start fixing it yourself. Ensure all connections are secure and the bulb is in proper working order. Once done, give yourself a pat on the back and say congratulations, as you’ve likely solved the issue!
Microwave Light Bulb Not Working: Possible Causes and Solutions
-
Light Bulb May Be Burned Out
A burned out microwave light bulb is one of the most common causes for it not working. To check and solve this problem, start by unplugging the microwave or shutting off the power at the breaker point. Then, locate the vent and remove the panel by unscrewing the screws. Once inside, you’ll find a box housing the halogen light. Carefully unscrew and remove the old bulb and install a new one. This straightforward process can rejuvenate your microwave’s lighting efficiently.
-
Problem with the Main Control Board
When your microwave’s light bulb is not working, the reason might be more complex than a simple bulb change. A common problem could be with the main control board. Before diving deeper, first check and ensure that the bulb, wiring, and sockets are working fine. A test with a multi meter can confirm if the right voltage is reaching the socket. If the light bulb has already been replaced with a new one and the issue persists, it’s time to consult an experienced professional or a technician. They can accurately diagnose and fix control board issues, which are often beyond the scope of DIY repairs.
-
Problem with the Light Socket
A problem with the light socket could be the cause why your microwave light bulb is not working. If you’ve already tried to replace the light bulb using the method given above and the light still doesn’t work, you might need to dig a bit deeper. Using a multimeter, test the socket for continuity. If it doesn’t show proper continuity, the socket likely needs to be replaced. This is a task where consulting a professional is advisable, especially if you’re not comfortable handling electrical components.
Conclusion
Fixing a microwave light might seem daunting at first, but with the right approach and tools, it’s a manageable task. Whether it’s identifying and replacing a burned-out bulb, addressing issues with the main control board, or dealing with a faulty light socket, each step requires careful attention. The key lies in starting with the basics like selecting the right bulb and ensuring the appliance is unplugged for safety. If the problem persists beyond a simple bulb change, it’s wise to consult a professional. Remember, patience and meticulousness are your allies in this process. By following these guidelines, you can effectively restore the functionality and illumination of your essential kitchen appliance, ensuring it continues to serve you well in your daily culinary adventures.

